Drop Down Menus CSS Drop Down Menu Pure CSS Dropdown Menu

Friday 3 July 2015

Armada Dice part I: Ship to Ship

I'm going to do an article or two on Armada, since I've been playing this just as much as X-wing in the last weeks.

One of the things that felt unfamiliar when starting Armada where the dice. Just like any new game, I did not have a "feel" for the dice. I did not know what to expect from them, if one roll was good or one wasn't. You might say that it's better not to know so you can't blame the dice when you lose! This is partly true, because you may want to gauge your performance realistically, to know how to play it better next time!

Armada dice and probabilities

This has been covered by many people, but we need this for this article as well. The basics of Armada dice are as follows: there are three types of attack dice, each representing a certain weapon type, having a maximum range and hit characteristics. Red dice are turbolasers, blue dice are ion weapons, black dice are missiles.

Red dice are the long-range weapons, that have a rather high variance of damage: there's 3/8 chance that you don't add a hit, but you also have 1/8 chance of a double hit. The average damage is 0.75 per die.

Blue dice are medium range dice. Though they have the same average damage (0.75) as red dice, the damage is more spread out, so you have lower variance among rolls. You also have 2 accuracy symbols, which help a lot in combat.

Black dice are brute force, 1 average damage per die, with a 25% probability of a hit+crit. While they can also come out blank, you are more likely to get good damage out of them. They also have no accuracy symbols, so they're better if mixed with other dice types.

Thoughts on combat 


While Armada does not have defense dice like X-wing, it does give ships and elite squadrons some defense tokens. In the rest of the article I will talk about damage dealt to a ship. Talking strictly on the current defense tokens:
  • Redirect does not affect damage dealt. It's still damage on the ship. The VSD has 10 shields, but shooting it over the course of the game you won't be able to fire on the same hull zone. Most of the times you'll start from one side and by the time you kill it you'll be on the other side shooting at it. At its weakest the VSD would look like 9HP (8 Hull 1 Shield), if you deplete all shields it will be 18HP. The actual situation will be closer to 18HP, even more if the Imperial player stacks combo Repair commands (+token).
  • Evade gets rid of 1 or 2 damage, so it affects damage dealt. 
  • Brace cuts the damage in half and is the most important defense medium ships (VSD, AFMkII) have. This token reduces damage on an attack by 2-4 damage, which is a lot in the context of a single round. Of course this will be much smaller if the attacker rolls very few dice, and might not be relevant at all against swarms of small ships (Corvette swarms firing 1-2 dice). 
If  our goal is to reduce damage taken throughout the course  of the game, each round we must guess which attack will have the highest resulting damage and keep the Brace token for that attack. Spending a brace twice is of course a reasonable action in some situations, but that is a topic for another time. Suppose we have the highest attack first, then we use Brace on that. Assuming we're piloting a VSD, we use Redirect more liberally afterwards (also subject for discussion for some other time).

Script for calculating damage dealt


What I'm getting at is the core of my calculation for damage dealt to a ship, specifically to a VSD. This is more interesting since it is relevant in all games, from 180pt to 400pts: How much damage will you deal to the VSD this round? I will make the following assumptions:
  • Attacks will be directed at the front, so there will be plenty of room for redirects
  • The first attack will carry most dice or at least have the most likely highest hit result. I will always brace on the first attack if it saves me a damage. Unused defense tokens carry over to the next attack
  • Redirects are from a "shared" pool, in this case 6HP worth of shields
  • The attacker will limit the use of Brace, Redirect and Evade, in that order (with accuracy symbols). If the tokens are used he will not limit them (also a good point of discussion for strategy)
I explore the tree of possibilities (tokens used, damage taken, shields available for redirect etc.). I sum probabilities on scenarios that share common criteria (in this case I aggregate according to total damage dealt in the end, including redirected shields). In this fashion I was able to calculate some average damage and draw some conclusions.

Single CR90


Let's take a look at the damage dealt by a single Corvette, firing from its front hull zone at medium range. That's 2 red dice and 1 blue, for a maximum of 5 damage (not possible given that the VSD has Brace).  You can do maximum 4 damage to the VSD if you have 2 double hits and an accuracy to forbid Brace. What you can also notice is that 0 damage is very unlikely, in stark contrast with X-wing. Here, there is no "barrier of entry", you don't have to exceed green dice. When shooting at a Star Destroyer, you're going to do at least 1 damage if you have at least 1 hit/crit symbol in your roll (because it doesn't have Evade). This becomes especially important in squad vs. ship scenarios.

 If you are on the offensive you will probably have a Concentrate Fire command ready on the Corvette. Perhaps you will try adding a third red die first. But red dice have blanks and only one accuracy, so you're not getting rid of that Brace too easily. There is a net increase in damage, but you'll find more average damage with an extra blue die.

 As can be seen in the next graph, just adding a blue instead of a red boosts average damage from 2.23 to 2.31. You can see the difference clearly in the upper and lower limits. 3 Red dice and 1 Blue have 1.32% chance of doing 0 damage, while 2Red 2Blue have only 0.88%.


Conclusion nr 1: Add blue dice over red dice if possible!


Double arcs with the CR90


 With a Corvette it's not so hard to get a target in two arcs (front and one side). You might think that the side is too weak, only two dice. It turns out that shooting one more time is significantly better than just adding one die (naturally, since there's two), and it's almost twice as good as the first frontal attack! This may be a bit surprising, until you consider that Brace won't be used for two attacks (especially not 2-3 damage attacks), so the second attack actually has a higher expected damage than what it would normally be, since it will not be Braced for (unless Brace was not used in the first attack)!
Conclusion 2: Getting double arcs on a target is more important than commands

Ok, clearly we're starting to be confident in our little corvette. Let's put Concentrate Fire on it while it has this brilliant double arc. We should probably add a blue die, but to which attack? Do we want a large attack and a small one, or two balanced ones? Again, because of the Brace token, we need to split hits between attacks, such that one Brace use cancels as few hits as possible. If we boost the already-large front dice pool, we have 2-2-0 (2 Red 2 Blue) and 1-1-0 on the sides, which amounts to 3.54 average damage. But if we enhance the weaker side (2-1-0 and 1-2-0), we get 3.60 average damage. It's not much, but every bit counts!

Conclusion 3: Even out dice pools if possible!

Bring on the Assault Frigate


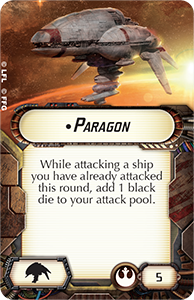
We reached 3.60 damage in a round, but we want to bring down that Star Destroyer. We need bigger guns! Let's take a state of the art Assault Frigate mkII with Paragon title, Enhanced Armaments. Enhancement Armaments add a Red die to the side, while Paragon adds 1 Black die to the second attack made on the same ship (which we will get if we have a double arc). This is much harder to do with an Assault Frigate than with Corvettes, but has the advantage of possibly setting this up on the approach and while running away (the rear hull zone is as good as the front). What may surprise you is that Concentrate Fire may add 1 Black die to the second attack!


What we have learned so far is that we want to add the strongest die. Currently this is the Black die, at 1 average damage. We could add this to the stronger attack (2-1-0 from the front and 4-1-2 from the side), or we could balance out the attacks (4-1-0 and 2-1-2). The latter comes out as more efficient, as our newly bred intuition told us, with a 6.45 average damage (vs. 6.34). First this seems great, and feels great too! Dishing out 10 damage to a Star Destroyer definitely seems the best choice. But then again, this isn't much more than double what a single aligned CR90s would do (with no Concentrate Fire!).

Back to CR90(s)


Clearly this is a much riskier scenario, and one of the Corvettes might die this round, but let's see how much damage we can muster just by aligning arcs, no Concentrate Fire! These are 10 dice just like the Paragon attacks, but without any black dice and spread across 4 attacks. No attack is obstructed because you attack with the first one, move, survive the VSDs assault, then fire with the second CR90.
... about the same damage. With the same distribution. The brace on the bigger attack cancels out with the black dice on the second, so you get about the same average as with reds and blues.

Conclusion 4: You can achieve the same result with 1 big ship with quality dice or with several smaller with average dice

There are a few things to take from this: Pre-planning is ok, getting that Concentrate Fire when you need it is great, but getting good arcs is substantially better. The more dice you throw at your opponent, the better! This sounds simple, and it was also true in X-wing, but here the expected damage increases linearly, even with the use of defense tokens. It's also important to make the good small decisions, which add up: should I add a blue die or a red die to my pool? Should I add an extra die to this attack or to this one?


Friday 26 June 2015

Video Battle Report #3

A friend from the Netherlands, Charlie, has asked me to join him on some video battle reports. This time, he's no longer TOing the tournament, but in fact playing in the finals! Subsequently I'm commenting along with Faan, winner from our first video!

This is a video from a tournament held in Amsterdam, on the 6th of June 2015.All the participating lists can be found on the corresponding entry in ListJuggler


Monday 22 June 2015

Hello World

Hello, world!

So this my first post, although it doesn't look like it. I've been trying to start a blog for a while now, but never felt like it was "ready", I didn't want it to start empty. So now I'm starting with ~10 posts. Some are battle reports I have written earlier, some are guides I have published before on other sites (I'm Chilligan on FFG forums). Some are new.

I plan on including a lot of X-wing related things on this blog, maybe some Armada too. Guides, Battle Reports, photos, anything, in the hopes of helping the community grow, both in Romania and in other places.

Have a picture of A-wings doing A-wing things.


Sunday 21 June 2015

Rebel Buying Guide - Waves 1-5

You've bought the Core pack, you like the game and want to delve right into it. But there's so many expansions! Which one to pick? Luckily, there's no such thing as a bad ship (well, except the TIE Advanced, at least until MayJulyAugust 2015 when the Raider Corvette introduces some special cards for it), but some are more efficient than others, and some come with good cards to complement the ship, some don't. Despite that, I'd still recommend buying the ships you like first, since you will be more determined to make them work! Upgrade cards are also important though, and some of them have not stayed relevant. Some have found a niche use, while other are doomed to never see play. More of these types of cards are in the earlier packs, unfortunately. In general, ordnance in waves 1-3 is severely underpowered and some of the earlier Astromechs and Elite Pilot Talents don't affect the game that much. 

I'm going to go through  the Rebel expansion packs and discuss the relevance of the ships and upgrades to the state of the game as it is now (I will avoid discussions about the "meta" and list-building, and stick more to efficiency of ships in the general sense). I'll leave it to you to find out which expansions best fit what you want to play.


Wave 1 - X-wing expansion pack


The expansion pack for this iconic ship comes with two new unique pilots with very good abilities. The ship itself suffers in survivability compared to the B-wing, and is not seen as often because of this, but if you like X-wings, Wedge is the definite pilot for it. In some builds Garven's action economy (pass along a focus after using it) helps a lot, so he is a good pilot.

The cards are pretty disappointing though:
  • Marksmanship(niche): good for ships that attack more than once per round (Cluster Missiles, Gunner, Corran Horn)
  • Expert handling (subpar): most often used on big ships that can't barrel roll naturally. The stress, spent action and use of an EPT make it a borderline bad card though.
  • R5 astromech (niche): Inappropriate on a X-wing, since you are almost dead by the time you get to use it. It has its (limited) uses on Y-wings.
  • R5-K6 (bad): It does the same thing as Fire Control System, at the same point cost, but only works 3/8 of the time.
  • Proton Torpedoes (bad): There's no way around saying this. You spend the target lock, you get 4 dice with little modifications, expected damage to the defender comes about the same. 


Wave 1 - Y-wing expansion pack


One of the two ships the Rebels have able to carry turrets, the Y-wing is a good Ion Cannon Turret ship, with decent survivability. It has a modest dial though, so expect to go slower with this ship and K-turn very rarely. Dutch Vander has a good action-economy ability (2 TLs instead of one), but Horton's ability is less useful, since it is designed with range 3 ordnance in mind.  He might see a lot more play if we ever get a range 3 turret (now known to be included in wave 7).

The cards offer the minimum necessary for this crowd control ship:
  • 2x Proton Torpedoes (bad)
  • Ion Cannon Turret (excellent) : The definite crowd-control weapon. Set up killing blows, fly ships off the table.
  • R2 astromech (niche): Still one of the better generic astromechs, especially for its cost. There are plenty of better unique astromechs though. 
  • R5-D8 (subpar): A simple focus will save you a hull point 25% of the time (on a Y-wing, more on an X-wing), and can be used for attack if you survive and don't use it. This is slightly worse than that.


Wave 2 - Millenium Falcon expansion pack 


The YT-1300 freighter is the first large ship expansion. It contains the ship, 14 (!) upgrades cards (with multiples for the good ones) and a unique scenario to play. This is probably the most successful ship in X-wing, having weathered all the possible meta-games since its debut in wave 2 up to wave 5 and beyond. The 360° firing arc and 3 attack dice give it good firepower. Coupled with a fantastic dial, the ship becomes very good in the hands of an able player, but proves to be very forgiving for the novice as well! The unique pilots all have movie fame, and they don't disappoint!
The cards are also very good:
  • Engine Upgrade x2 (excellent): There is no big ship on which Engine Upgrade isn't good, especially if it is an ard-dodging-turret-wielding large ship.
  • Shield Upgrade x2 (excellent): While it is quite a waste of points to put this on a Milllenium Falcon, the card is very good, and will often find use on high-agility ships (A-wings, E-wings, TIE Interceptors,TIE Defenders)
  • Weapons Engineer (good): This card is great on ships that can pass Target Locks (Colonel Jendon on the Lambda Shuttle), or on ships that fire multiple times (the Epic ships). Its efficiency on the YT-1300 is limited however. 
  • Chewbacca crew (good): A crew card that costs as much as a Shield Upgrade, but saves you at least 1 hull and 1 shield, possibly a critical effect as well. This card shines on 2 agility ships, but it's good on the Falcon as well. 
  • Nien Numb (good): Nien Numb isn't that necessary on a Falcon unless Lando is piloting (some nice fluff right there) or you're using Push the Limit. It's very good on ships with limited greens, such as the HWK.
  • Gunner (excellent): a top notch card, perfect for the Falcon. Han Solo with Gunner rolls dice up to four times, one of those rolls has to be good, right?
  • Millenium Falcon title (good): If offense is covered you can spend an action for added survivability.
  • Veteran Instincts (excellent): Pilot Skill has increased in importance, and this is one of three cards that can modify it. Good for winning the PS bid (having higher PS than your opponent) on any ship.
  • Draw their Fire (good): This card is pivotal in many lists, because of its synergy with pilot Chewbacca or with shield regeneration (Luke + R2-D2)
  • Elusiveness (bad): Taking stress is no small matter, and taking stress with 50% (or more) possibility of it being all for nothing is just bad. Taking an Elite Pilot Talent slot and costing 2 points is even worse.
  • Assault Missiles (good in Epic): This is included in the bad ordnance of waves 1-3, but does much better against swarms or clumps of ships (of which you see plenty in Epic, not so much at 100 points anymore)
  • Concussion Missiles (bad): The equivalent of Proton Torpedoes for missiles


Wave 2 - A-wing expansion pack


Originally designed as a fast and maneuverable missile carrier for the Rebels, the A-wing has suffered because of the lack of good missiles. Upon redesign, the A-wing can lose the missile slot for a 2pt discount (Chaardan Refit, available 3x in the Rebel Aces pack). This makes the PS1 Prototype Pilot an excellent 15 point blocker and brings down the cost of the EPT-capable Green Squadron to 17 points, the cheapest ship with an EPT for the Rebels. The A-wing can still be run effectively as a missile ship if you have some of the newer rockets (Proton Rockets are a good example). Otherwise, I recommend getting this expansion after Rebel Aces, to benefit from those cards. The pilots included are pretty good, Tycho is amazing at doing maneuvers and Arvel can work quite well with some of the newer upgrades.

The cards included are of the missile variety, with one notable exception:
  • Concussion Missiles (bad): The equivalent of Proton Torpedoes for missiles
  • Cluster Missiles (situational): Can be good if you have a good setup, TL + Marksmanship for instance to modify both attacks, against a 0 or 1-agility ship will be devastating.
  • Homing Missiles (bad): The only ordnance in waves 1-2 that doesn't spend a TL, but costs a fortune.
  • Push the Limit (excellent): If you're not getting Imperial Aces, then this is the only expansion where you can get this card, it's worth getting just for this. Action economy proved to be very important in X-wing, and this card was a no-brainer pick for an EPT for a long time. Still auto-include in many lists today.
  • Deadeye (bad): Makes ordnance slightly less bad (you still spend the equivalent of an action, but are spared the necessity of getting to TL that ship) with the cost of 1 pt and an EPT slot. Not worth it.


Wave 3 - B-wing expansion pack

A mainstay of the Rebel fleet, the B-wing hits like an X-wing, is very customizable (even more with the Rebel Aces B-wing/E2 that adds a crew slot) and has very good tight maneuvers (although those are red).

  • Proton Torpedoes (again!): How can this card keep coming up?
  • Advanced Proton Torpedoes (situational): I hesitate to call this bad although it's incredibly expensive and needs range 1 because it modifies 3 blanks to focus symbols, so if you have a TL + focus at range 1 you will have a large number of hits.
  • Ion Cannon (good): A good control cannon, perfect for the B-wing firing at range 3.
  • Autoblaster (niche): The B-wing isn't a very fast ship, so getting in range 1 will be difficult if your opponent avoids this on purpose.
  • Fire-Control System (excellent): The perfect card to increase firepower on a vanilla B-wing, or any other B-wing for that matter.


Wave 3 - HWK-290 expansion pack

A support ship with interesting abilities. Despite its ugly maneuver dial (probably the worst in the game), this ship finds its way into lists because of its turret slot, pilot abilities and crew. The support abilities are varied, Roark gives PS12 to a ship, Kyle gives out a focus, Jan Ors gives an extra attack die (for any type of attack). The range on these abilities is fantastic (1-3), so the support ship can stay out of harm's way while still providing the effect. About as resistant as an X-wing, the ship has greater survivability because of positioning in the squad, crew upgrade options (Chewbacca could give it 2+ HP for instance) and possibly infinite focus token stacks.
The upgrade cards form a pretty good bunch:
  • Ion Cannon Turret (excellent)
  • Blaster Turret (excellent): 3 dice turrets are expensive, and with this card you pay for those 3 dice with a focus token (to be able to shoot) and with maximum range (2). And it's still worth it.
  • Intelligence Agent (good): Although this isn't exactly good on a HWK, it's a useful card. Being able to see another maneuver is good, but you also need a way to react, which a HWK without an Engine Upgrade would not have. One of the best ships for this upgrade is the TIE Phantom, especially with the new Decloak rules, where the Decloak takes place just after Intelligence Agent triggers, giving the TIE Phantom vital information.
  • Recon Specialist (excellent): Action economy 101, 2 is better than 1. You can use 1 focus for Blaster Turret, 1 for dice modification, or just 1 for attack modification and 1 for defense. The possibilities are there and it's extremely versatile. Not to mention the synergy with the Moldy Crow or with Jan Ors (crew)...
  • Saboteur (bad): A card which echoes wave 1 so much - spend an action to maybe do something that is not always possible. The enemy has to have hull damage, you have to be in range 1(!), you have to spend an action, then roll for 50% chance of it all being for nothing. Then slam fist on table, then never take Saboteur again.
  • Moldy Crow (good): The HWK needs focus. Whether to share with others (Kyle), or to shoot its Blaster Turret, or merely for more defense, it needs focus. This allows it to accumulate focus tokens in the first rounds of the game, or otherwise keep those that it doesn't spend.


Epic Wave 1 - Rebel Transport expansion pack

The Rebel transport may not be allowed in 100pts matches, but its escort is! This pack brings 4 more Rebel pilots for the X-wing and some cool upgrade cards. While the pilots are good, the X-wing is still less efficient than the B-wing and sees less play. Tarn has an action economy ability, which due to its timing transforms it into a defensive one (coupled with the R7 astromech). Hobbie has an ability which gets rid of stress easily, pairing him well with R3-A2, Jek gets rid of stress very easily, but with a high risk and Wes strips tokens off the opponent. Of all the abilities, Wes' ability is the most lackluster, since it only strips one token, you have to build your list around that. The rest of the abilities work well in their respective scenarios, but fail to give the X-wing enough of an edge to reenter the battlefield in force.
  • R2-D6 (good): There are several X-wing pilots that can use this to great effect (not to mention Y-wings). Biggs and Garven can certainly use an EPT.
  • R3-A2(excellent): A very good control card. You take one stress to give one stress, with the single constraint of having the opponent in your firing arc. There are many reasons you would want to do this: you may have an easier time getting rid of stress than the receiving ship, or the ship you're putting stress on is of higher value than yours. This card is made even better with the introduction of the BTL-A4 Y-wing, which shoots twice, stresses twice at range 2.
  • R4-D6(subpar): A card that will work very rarely and give you little value. Your ship is being focus fired? You can trade that damage for stress and survive another round. With one stress or two , you may be dead in the water the following round too. May find an use on targets that only need to survive that one extra round (thinking of Biggs here).
  • R5-P9(good): What makes R2-D2 great is that it doesn't require an action. This card almost requires an action, but you can obtain a focus token in other ways. Still, you might actually keep the focus token while defending, spending it if it saves you 2hp or more.
  • Flechette Torpedoes x3(good): This torpedo is better than others since it automatically gives stress to your opponent, whether it hits or not, which may prove crucial against some ships you may be facing against. It is quite cheap as well.


Epic Wave 1 - Tantive IV expansion pack

The Correlian Corvette brings some very nice cards for non-epic play:
  • C3PO (excellent): C3PO gives you an evade once per round if you guess correctly. A very fluff-based card ("Never tell me the odds"), this card amounts to a guaranteed evade on a 1-agility ship such as the YT-1300. In a game containing dice, being able to control the outcome of certain engagements is very powerful.
  • Han Solo (good): Ever had a TL and then rolled all focus symbols? This is what this is for. A card that makes your TL better than a "normal" TL, but less good than a combination of TL+focus. While this is ok in 100pts, there are better options for 3pt crew. The Epic matches are where this card really shines, since the Corvette has no way of using a focus token. 
  • Leia Organa (niche) : I'm marking this as niche since you may be able to craft a scenario in which all of your ships have to K-turn at once and still get their actions, maybe.
  • R2-D2 crew (good): I like this card since it's the exact opposite from early astromechs. This will almost always give you something good, and might do something bad. And the best part is, the bad doesn't stack up and might not happen at all. For instance, if you have no damage cards, there is no chance of one getting flipped over. If you have one damage card that's already flipped, again, no chance of it doing further damage. Sure, Minor Explosion becomes your worst enemy, but hey! there's only 2 of those in 33 damage cards.


Wave 4 - E-wing expansion pack

The E-wing can be seen as a more expensive X-wing. The extra point cost goes into added speed (5 forward and green 2-banks), durability (an extra agility die) and versatility (Systems slot). While the non-unique pilots seem to pay too much for those benefits, the named pilots compensate by having amazing abilities: Etahn has an aura ability which applies to every attack on an opponent in his firing arc, much more powerful than a range-1 aura. Corran Horn is a monster, since he can shoot twice in a single round, at the cost of not shooting the following round. FCS, opponents stripped of tokens make this second attack very powerful.
The cards are quite good, Advanced Sensors was only available on the Lambda before, astromechs are very useful:
  • Advanced Sensors (excellent): This card might not seem like much at first glance. Surely an action is still an action, whenever you do it? But then you realize you could focus before K-turning, or focus before a bump, or Barrel-roll then do a maneuver. You could even Push the Limit for two actions, get a stress, do a green maneuver, then clear the stress! Turns out Advanced Sensors is an amazing card. 
  • Outmaneuver (good): This card gives you Wedge's ability if you are outside your opponent's firing arc. While not exceptional against small fighters, this card is very good against large turreted ships, since it triggers more often and shuts down C3PO use on Falcons.
  • R7 astromech (situational): After doing the math I can say that this negates one of their modifiers. You TL, the opponent TLs, they cancel each other out. Unmodified attacks get halved down, which is good. I have yet to see this in play however, apart from the Tarn+R7 combo.
  • R7-T1 (good): An action economy droid, giving two actions for one in certain situations. Good for Y-wings that want to get out of arc, or high-PS X-wings closing the distance.
  • Flechette torpedoes(good)


Wave 4 - Z-95 Headhunter expansion pack

An inexpensive missile carrier, made to be the equivalent of the TIE Fighter for Rebels. It is quite efficient as 12pt filler, many lists will use 2-3 headhunters to fill up the ranks. It flies similar to the X-wing, but has a 3k turn, for better or worse. Lieutenant Blount is a great one-time delivery boy for Assault missiles (since his missiles always hit) and Airen Cracken gives out a free action in the Combat Phase (which is a very interesting timing for movement actions).
The cards are pretty ok:
  • Wingman (situational): A neat little EPT which clears a friendly of a stress. Very good in specific builds.
  • Decoy (situational): A similar card to Swarm Tactics, but with a greater leash (range 2) and which switches PS. Requires the entire list to be built around it, suffers greatly when one of two ships dies or gets an Injured Pilot. It can get a Phantom (even Echo) up to PS11, so it can be scary.
  • Munitions failsafe (situational): For 1 extra point, you can make sure you never discard a missile that didn't hit. Great for high-cost missiles, though not so often seen.
  • Ion Pulse missiles (good): Great against low-agility large ships that have an asteroid in front of them, decent otherwise, since it doesn't require you to spend a TL to use it.
  • Assault missiles(good in Epic)


Wave 4.5 - Rebel aces expansion pack

Rebel aces pack brings new paintjobs for the B-wing and the A-wing, together with new pilots and genuine fixes for the A-wing. The A-wing pilots get better defense (Gemmer Sojan), or pure action economy (Jake Farrell, who can also Barrel Roll) . The B-wings get to shoot torpedoes out of arc (Nera Dantels) or a stress-for-focus incredible ability (Keyan Farlander). Keyan is the clear winner of the bunch, and outshines any other B-wing pilot by far.
The upgrade cards tie in to the A-wing fixes and to the addition of the two-seater B-wing:
  • Chaardan Refit x3 (excellent): The fix for the A-wing repurposes the ship from the original missile boat to a flanker/annoyer. This card is an auto-include for any A-wing, but also increases the relative cost of any missile that an A-wing carries. 
  • A-wing Test Pilot (excellent): As TIE Interceptors have two modifications, the A-wing is allowed to have 2 EPTs. It's so good it makes it easy to get carried away and put too much on a single A-wing. 
  • B-wing/E2 (excellent): The B-wing was already versatile, now it can carry an additional slot at the cost of 1pt and the Modification slot (which was not used on the B-wing anyway). Good options include Tactician, Jan Ors, C3PO, Chewbacca etc.
  • Proton Rockets (excellent): A good card that is used on A-wings even if it raises their cost by 5pts, the proton rockets have a maximum of 5 dice, do not require a TL, do not require spending a token, they require only that the attacker is in range 1. 5 dice with focus is good damage, and it's quite easy to have a TL+focus when shooting these rockets. 
  • Kyle Katarn (excellent): Action economy tied to stress removal, which is very good. Kyle Katarn triggers even if a ship bumps, even if a ship is double-stressed. In combination with PtL, allows ships to potentially do three actions per turn.
  • Jan Ors (good): An evade token is worth more than a focus token for many rebel ships. This card synergizes extremely well with many other Rebel pilot abilities or upgrade cards(Garven, Kyle Katarn both pilot and crew, Recon Specialist), since many pass focus tokens among them. Another neat thing is that it can work on any ship in range 3, including the one it is on.
  • Enhanced Scopes (niche): If you really want to move before those blocking ships. Vital on a Lambda with Anti-Pursuit Lasers, possibly having other uses.


Wave 5 - YT-2400 expansion pack


The smaller cousin of the Millenium Falcon, this ship only has a 2-dice primary turret, but compensates by being able to carry a cannon and shoot it out of its arc! It's also the first large ship to feature a native barrel roll action. Along with a dial including most of the existing maneuvers, this ship turns out to be very maneuvrable! The first unique pilot, Eaden Vrill, isn't that great, he allows an extra die for the primary weapon attack if the opponent is stressed, the second pilot, Leebo, has a defensive ability (choose one faceup damage card to take from two options). The third pilot, Dash Rendar, has a very good ability, very well matched with this large ship, it can ignore obstacles in the Activation phase.
The cards included are either new cards (most of them good) or older cards that work really well on the YT-2400. This is one of the more self-sufficient packs, in that a lot of the cards you need are already included:
  • Lone Wolf (excellent): A reroll of one die both on defense and offense, triggering as many times as you want per round, with only two conditions. Getting blanks is fairly easy to do and getting out of range 2 from any friendlies is easy in a 2-ship build or towards the end of the game.
  • Stay on Target (situational): This card was designed by Paul Heaver, Worlds' champion two years in a row. The idea was to give an extra edge to high PS pilots. While the effect is good, the cost is too great. You receive a stress (and skip "perform action" phase) each time you use it, plus the 2 points and EPT slot. It can definitely see play with ships that don't mind stress (on Keyan for instance it's good), but otherwise there are better options for EPTs. It could also be used as a card that compensates for mistakes, which increases its value for new players.